If you’re a seasoned backpacker, or even long distance hiker, you already know about the 10 Essentials; a list of the essential items each outdoorsman should always carry. It was created by The Mountaineers in the 1970’s and then modified for new tech in 2003.
While it’s become second nature for outdoor enthusiasts to carry these items, for newcomers it’s a new concept and once you’ve seen the list your first thoughts might gravitate towards: How am I supposed to carry all that?!
Related: 10 Reasons Why You Need to Go Backpacking
Attention: My post may contain Amazon affiliate links! As an Amazon Associate I earn from qualifying purchases.
Whether you’re going out for a few hours or a few days, you should always bring these items. as your safety might highly depend on them.
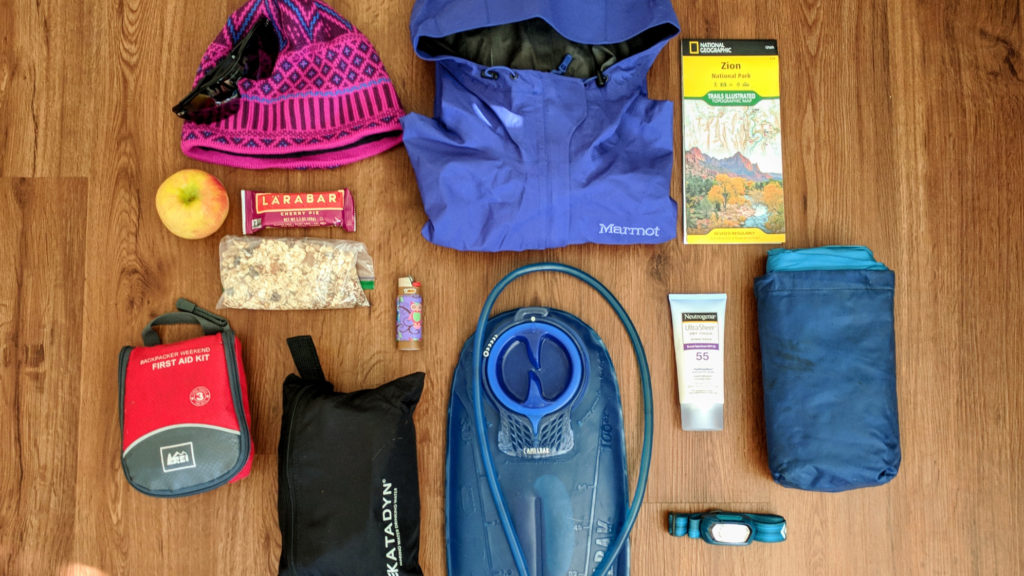
Here’s the list:
- Water
- Food
- Navigation
- First Aid
- Insulation
- Sun Protection
- Light
- Fire Starter
- Repair Kit
- Emergency Shelter
Now let’s break this down into detailed blocks:
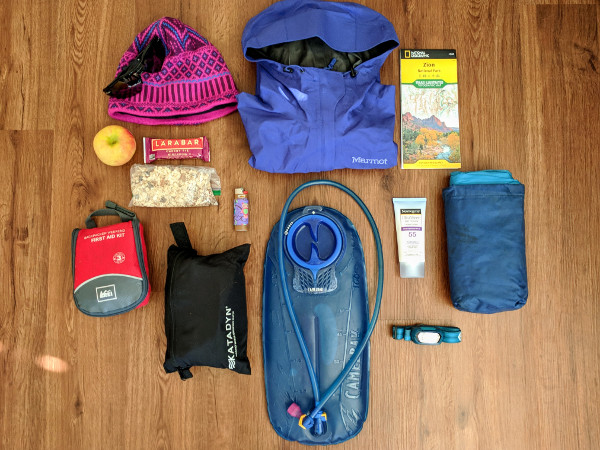
Water
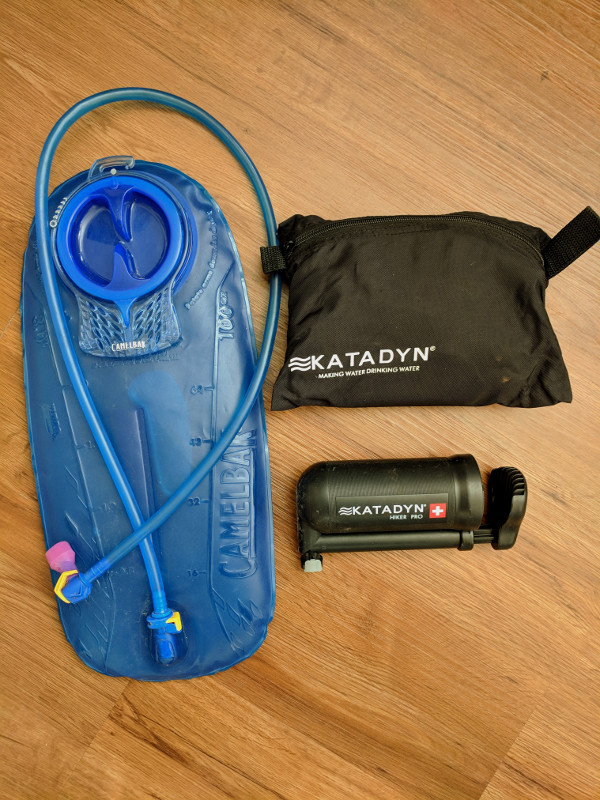
Generally speaking, you can survive approximately 3 days without water but it’s not pleasant. This is why water is a must, no matter the length of your trek or the weather/trail conditions.
Most day hikers carry a 1 liter nalgene. For backpackers, taking along a water filter is a must, as well as, a minimum of 3 liters of water. Personally, whether it’s backpacking or a day hike I always carry a 3 liter bladder.
I like to carry the Katadyn Hiker Pro Water Mircofilter as it’s lightweight, fast (can fill a 1 liter bottle in a minute) and does an excellent job of removing most harmful viruses, bacteria and particulates.
Iodine tablets are useful as a backup and will kill most viruses and bacteria, however, it won’t kill certain parasites like Cryptosporidium. Iodine tablets are light to carry, work in about 20-30 minutes, but have a slightly metallic taste. Still, it’s good to have it with you as a backup.
Food
Have you ever been ‘hangry’ out on the trail? I sure have and my husband tells me it’s not a pretty sight…
This is something you customize for each trek, depending on whether you’re taking snacks for a day hike, or full meals for a backpacking trip. My suggestion, try looking for high protein, high calorie items like nuts, jerky, trail mixes and bars. You can easily make your own granola bars & trail mixes at home.
If you have a dehydrator, try making homemade fruit leathers or my Spot On Jerky!
Navigation
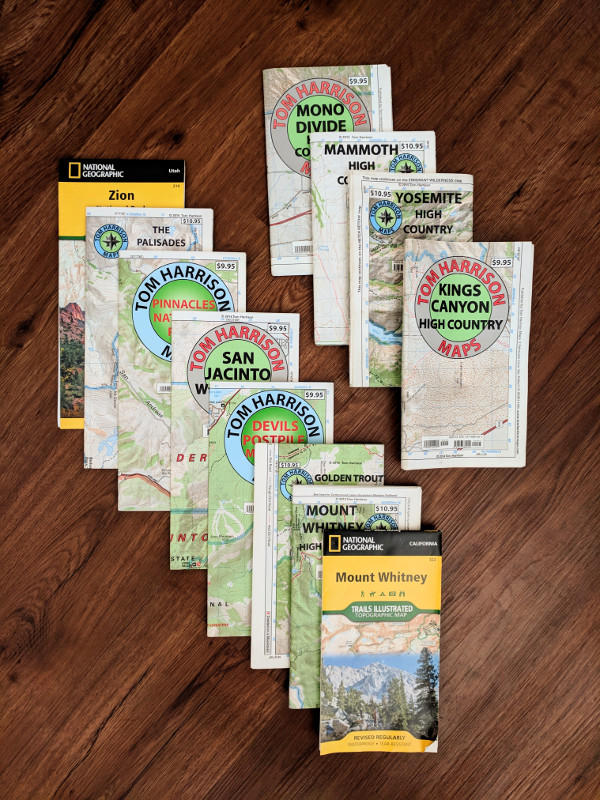
Best thing to do if you get lost: keep calm. Nowadays most phones have GPS and you can download hundreds of trails apps like AllTrails (Free) and BackCountry Navigator ($11.99). We use BackCountry Navigator on an old smartphone and it’s been superb!
A paper map of your trail and the surrounding area is also super helpful in case your GPS or phone loses battery.
In addition to having a map and GPS/trail app, check in with the Ranger Station if you can on your way in and way out. Some parks will require this, so check ahead of your arrival.
First-Aid
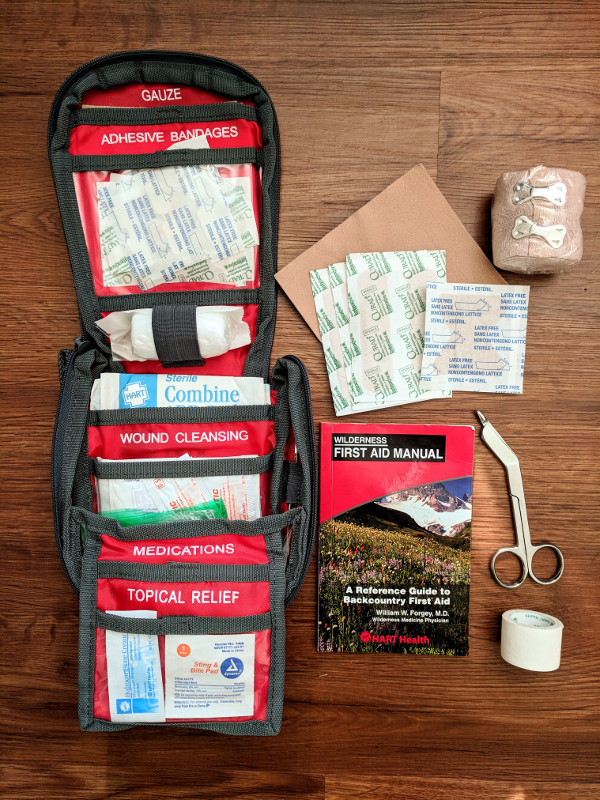
Let’s be real here: when you’re out in the wildness with friends someone is bound to get hurt or, at least, a gnarly blister (See REI’s cure for blisters).
There are tons of first aid kits out there, as well as some really awesome articles/videos on making your own kit. For example, my friend LeeAnn, who joined our Grand Canyon trip, had a clear nalgene full of first aid items to cut back on weight. Super clever!
While you won’t need to carry a whole pharmacy you should have the basics : band aids, ointments, tweezers, pain killers and moleskin. Some store bought first aid kits will have more than others but once you have the basics you can add necessary items as you go.
I’ve been using the REI’s Backpacker Weekend First-Aid – Unfortunately they no longer make this one but the HART Health Weekend First-aid kit is pretty much the same thing. It has all the basics for any injury, it’s affordable, and folds easily into a zipper pouch. The fact that it’s red makes it easier to find in your pack.
Pro-tip: I inspect it before heading out and resupply it after each trip, if necessary.
Insulation
You started your trek out with sunshine and high temps; better yet, you’ve made it to the peak just in time for a spectacular sunset! But when that sun sets and the temperature drops, or the weather takes a turn for the worse, you’ll be struggling to keep warm & dry, especially in the cooler seasons and/or at higher elevations.
Layering your clothing is highly recommended as you can put on or take off whatever you need to take keep your body at a comfortable temperature. Keep in mind the weather you’re heading out into and make sure pack accordingly.
For example: a full day hike in the high Sierra Mountains, early-summer:
Base Layer: sports bra and/or quick drying underwear, sock liners, socks (I personally use Darn Tough)
Mid Layer: hiking pants/shorts, moisture-wicking t-shirt or long sleeve shirt
Top Layer: fleece jacket and/or windbreaker, or lightweight down jacket
These are just the basics which you can build off but, again, your clothing choices will really depend on the weather and your comfort level.
Sun Protection
As much as I hate putting it on, sunscreen is the best protection around even for those who swear they don’t burn. UVA and UVB are the largest contributing factors when it comes to skin cancer which, on average, effects over 3 million people each year.
Doctors recommend using sunscreen with an SPF rating of 15+ but because I’m pale I use a sports version sunscreen that has SPF 50. Overkill? Perhaps. Sunburns have landed me in the hospital before so I’m glad for the additional SPF protection.
Hats and sunglasses are another big things for sun protection. You can wear anything from a baseball hat to outdoor sun hats but in warmer climates you may want something with ventilation.
In the winter time I use a wool hat with either a fleece or micro-chamois liner that allows moisture to escape through the fibers while still retaining heat. Keep in mind, your head and feet are the major areas for heat so keep them cool in the summer and warm/dry in the winter.
For me, sunglasses are a must! Constantly squinting can force the muscles in your temples to work overtime leading to wrinkles and migraines. While I personally love Oakley for my sunglasses you can honestly use any brand.
Light
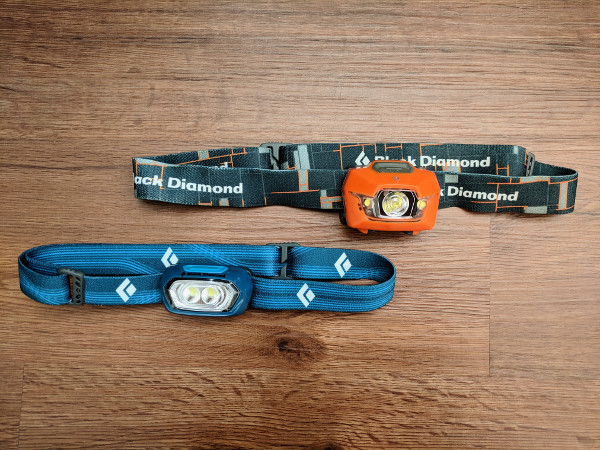
The sun is setting and you still haven’t reached your destination. Looks like you’re going to have to hike in the dark. And while most phones have a “flashlight” mode it’s annoying to have to carry it while trying navigate the trail. That’s where a small, reliable headlamp comes in handy because it’s, well, on your head rather than in your hand.
Look for one that has several modes including a dimmer for white light, a red light mode to help keep your night vision and a flash mode that can be used to signal help.
Honestly, I use mine for more than just backpacking since it’s super versatile. Just make sure to carry spare batteries in case you’re running low.
Fire Starter
Some backcountry areas allow a campfire (always check with the ranger station as to their current fire rating/condition). Alex and I will each carry our own lighters and kindling can be made from dried sticks, moss and more.
When building a fire, whether it’s for warmth, cooking, nostalgia,whatever it is, be sure there is a good 20′ clearance around you and that it’s free of leaves & debris. Create a pit with large rocks surrounding it and keep the fire small. No need to create a bonfire.
When you’re ready to leave (or turn in for the night) make sure your fire is completely out using, at least, 1 liter of water to cover the coals. Stir with a stick and hold your hand 6″-12″ above the coals, checking hot spots. If at that height it’s still warm, douse with more water.
Having waterproof matches or a magnesium fire starter are a great back up in stormy weather.
Repair Kit
While I do agree with this being on the 10 Essentials list I rarely carry a full repair kit.
Instead, I’m a believer in duct tape! I leave a roll in the house, in my truck, wrapped around my nalgene bottle and my lighter – honestly all over the place. It’s a cheap alternative to a full repair kit. You can use duct tape to patch a hole in your tent, apply to your heels for blister protection and tap down your shoes if the soles are coming off.
I honestly just love the stuff.
Emergency shelter
It’s smart to carry a tarp as you can hang, rig or fly it over your tent in the event of rain or snow, as well as provide additional shelter if something happens to your tent. Tarps are fairly light and can pack down pretty small.
I have the Sea to Summit Escapist Tarp and so far it’s been pretty good but a tarp from your local hardware store would work too.
An alternative would be to use natural materials like branches, logs and stones but…I’m lazy and use a tarp instead.
Related: 10 Reasons Why You Need to Go Backpacking
Sounds like a lot, I know.
Try splitting some of this up between two people so it’s easier to carry. You can also find a clever solution where you can use two items together, like my using duct tape around my nalgene bottle.
So there you have it. The 10 Essentials.
It’s best to be ready for any situation!